28 February 2012

Homemade Cheddar: Ricotta and Whey

If you're here to find out how to make cheddar, take a look at the previous post.  This post is about the byproduct (whey) and how to maximize its potential.

Ricotta, I have learned, means "re-cooked."  This is an extremely apt description.

After you have separated the curds from the whey when making cheese, put the whey back into a pot on the stove.  I didn't actually take a picture of the whey, but you can see it sitting in the bowl below - kind of a dishwater color.  Appetizing.
You should probably use the double boiler method here.  I was lazy.  I put the pot right on the stove.  Heat the whey up to 200*F.  As you can see, the why turns milky again - the ricotta has started to curd up.
 After attaining 200*, drain the whey off the ricotta.  I highly recommend using cheesecloth here, because the ricotta curds are so small that they'll drain right through a colander.
So obviously this is MUCH easier than making cheddar, but with much less yield.  I believe we got about 1/2 a cup of ricotta out of the whey.

Alright, so you've pushed this whey to give you as much cheese as you can.  But don't throw it away just yet - it is still healthy and useful.  It is full of protein!

Some great uses include putting it in soup stock, putting it in smoothies, using it to make bread or oatmeal, cooking rice in it, watering your plants with it, etc.  You can put it in virtually any recipe that calls for water.  I haven't drank straight whey, so I can't speak to the taste of it, but I haven't noticed the flavor in anything that I've put it in.  I don't think I care to try drinking it straight :)

25 February 2012

Homemade Cheddar

Homemade is always better.  Always.  Period.  You know exactly what is in it, and you know exactly how it was made.  Some things, like bread, are pretty easy to make at home.  And some things seem a little more daunting.  Don't be scared.  Cheese is much easier than you think.
 
There are three basic things that you need.  One is a double boiler.  The second is milk.  The other is rennet (or another coagulant).  I can see I lost you with that third thing.  Well, you can find rennet online or at some homebrew stores.  If you live in a real city, it should be easy to find.  If you live in the country, the best thing to do is find someone who makes cheese and ask them for a teaspoon or so of their rennet.

I don't have a double boiler, so I rigged a pot and my canner (and hockey laces - they are strong and long).  I am not using the laces to elevate the pot; there is a trivet in my canner.  I am using the laces to lift the pot out of the canner.

Step 1:  Sour the milk.  Bring a gallon milk up to 90*F in the double boiler.  Once it gets to 90*, add mesophilic powder (half a packet per gallon of milk).  If you don't have mesophilic powder, buttermilk or yogurt will have the cultures necessary to sour the milk.  Ask the internet.  Hold your milk at 90* for half an hour.

Step 2:  Coagulate the milk.  Dilute a teaspoon rennet in a little bit of your purest water, then stir it into the milk for about five minutes to ensure even mixing.  Once mixed, leave for 45 minutes (still at 90*) until you get a "clean break" - when you stick your finger in it, the white stuff breaks and whey fills the hole (if a milky colored substance fills the hole, you need to give it more time.) 

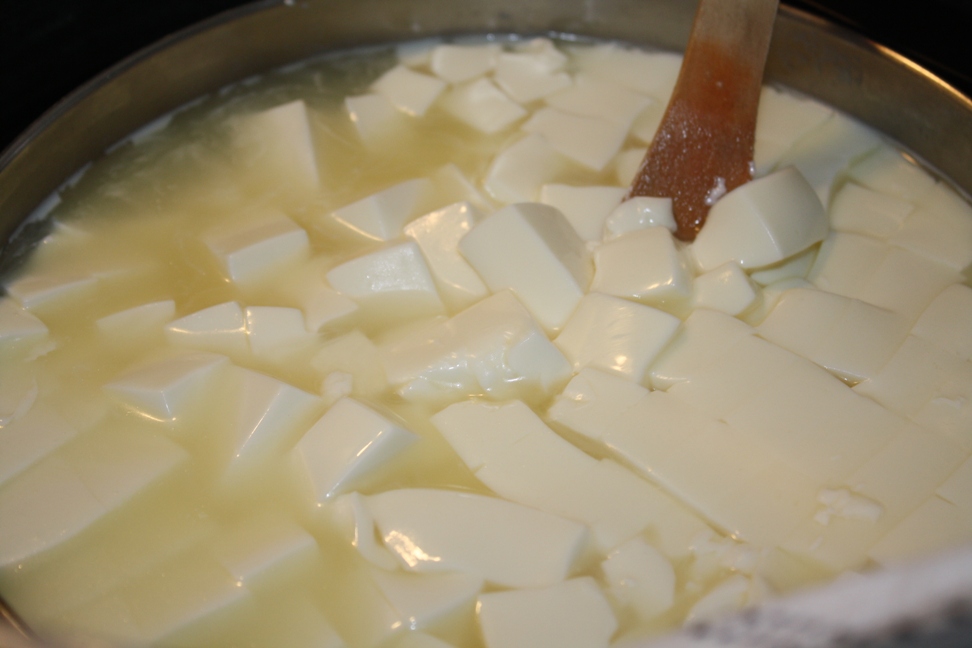
Step 3:  Cut it into curds.  After you achieve the "clean break," use a knife to cut the curds.  Make sure to cut all the way down to the bottom of the pot, slicing every 1/4 inch.
Let the curds set for 15 minutes to let them "heal" (still at 90*F).

Step 4:  Heat it up to 100*F slowly over the course of 30 minutes, stirring every 5 minutes.  Maintain 100* for 30 minutes, while continuing to stir.
 
Step 5:  Drain the whey.  Let the curds rest for about 5 minutes then drain in a colander.  This step separates the curds from the whey.  Don't throw away the whey!  It is still useful for many things.
Step 6:  Put the curds back in the pot, and keep them at 100* for an hour.  This will cause more whey to leach out.  At this point, mine looked like little cauliflower heads.  I'm not sure if I should have broken them up into smaller curds or not.  Also I was supposed to add salt and I didn't do that.  Whoops.
Step 7:  Press the cheese.  If you're making your first cheese and you don't want to put a lot of money into it yet, this is the step where you'll need to get creative. 

Start by draining out the whey.  Ideally you have cheesecloth that you can put the curds in, if not, this is your first cheese.  Make it work, people.  Maybe you have a sterile pillow case.  I don't know.
To make cheddar, here are the times and weights you need:
15 lbs for 10 minutes (take cheese out and redress it)
30 lbs for 10 minutes (take cheese out and redress it)
40 lbs for 2 hours (take cheese out and redress it)
50 lbs for 24 hours (take cheese out)

I figure, worst case scenario, you can tie your clothed cheese into a little package and throw some books on top of it.  I, on the other hand, got a homemade cheese press for my birthday (I consider this to be the better option).
So here is where I am pushing the cheese into a 4" tube.  It has a plunger to follow after the cheese.  Then after that, a flat surface is put on top, and books are piled on top of that surface.  There is just tin foil to aid with drainage, but we didn't really get any more whey draining off.
Every time I redressed the cheese I also flipped it.  While you have your 2 hour / 40 lb press going, you can use the whey to make ricotta  (look for this post early next week).

Step 8:  Let the rind form.  This part is so easy.  Just let the cheese sit out on the counter for 2 - 5 days, and flip it once a day.  I loosely draped cheesecloth over mine to keep out any dust.
Step 9:  Wax it.  I've posted about this before, so I'm not going into too many details.  I now have a dedicated wax pot, and I put about 2-3 layers of wax on the cheese wheel.  You really should use cheese wax, but if this is your first cheese, throw caution to the wind.  Use paraffin.  Or wrap it in plastic wrap.
 
Step 10:  Whew!  You still with me?  I didn't say it was a fast process.  I just said it wasn't as hard as you thought it was.  Take your waxed wheel and keep it in a 55*F environment.  Flip it once a day for a month, then after that you can get away with flipping it once a week. 
Step 11:  Age for 3-5 months.  Then eat it.  Tasty, tasty cheese. 

23 February 2012

Gluten-Free Almond Crackers

This is another one of those times that I actually followed the recipe so closely you're better off checking out Elana's Pantry for the real recipe for Paleo-friendly, gluten-free crackers.  Remember the canned almond milk disaster?  This is a use for all that almond meal.
Almond Pulp Crackers
  • 1 cup almond pulp (or almond meal + 1/4 cup water)
  • 2 tablespoons flaxseed meal
  • 1 tablespoon sesame seed oil
  • ½ teaspoon salt
  1. Combine all ingredients in a large bowl
  2. Roll dough into a ball, press between 2 sheets of parchment paper and roll to ¼ inch thickness
  3. Remove top piece of parchment paper
  4. Transfer the bottom piece with rolled out dough onto baking sheet
  5. Cut dough into 2-inch squares with a knife or pizza cutter
  6. Bake at 135° for at least 20 hours, or until crunchy
  7. Let crackers come to room temperature on baking sheet, then serve
Since I had dehydrated my almond meal, I packed the cup measure extra full, then re-hydrated it with some water.
 I also didn't have any flaxseed meal, but I do have some brown flaxseed and a blender.
 
Alright, so when you mix all the ingredients together, put them between two sheets of parchment paper (NOT the same as wax paper.  Lesson learned) and roll it out to ~1/4" thick.
 Remove the top sheet of parchment paper, cut into squares and bake.  According to the recipe, 135* for 20 hours.  My patience and my trust of the oven ran out before that point (ie I will not go to bed with the oven on), so I'm considering this part to be open to interpretation.
So while my crackers aren't as crunchy as I suppose they ought to be, they are definitely tasty, and they are a great way to use up the massive amounts of elderberry jam I procured last summer :)

21 February 2012

Roasted Pepper and Tomato Soup

I know I rave about all the recipes I post here.  I know it.  Is it a fault?  OR do I just know a good recipe when I see one?
Canned tomato soup and grilled cheese.  It was a staple on rainy summer days in elementary school, or snow days in the winter.  I was such a picky eater; I definitely disliked tomatoes.  It's one of the few things that I still dislike, although I've learned to tolerate tomatoes if they are diluted.  Fresh salsa is delicious, and even tomato slices served with fresh mozzarella and basil don't offend my taste buds.  I don't think straight-up tomato soup would be appealing to me, but this adult version - roasted red pepper and tomato soup - put the canned tomato soup of my childhood to shame.

Things to roast:  red peppers (3), onions (1) and some garlic.  Put them under the broiler for 15 minutes.
 
Things to simmer in the meantime:  a large can of tomatoes, the rest of the canned jalapenos, and, when roasted, the peppers etc.
 
In batches, blend this until smooth (or slightly chunky, depending on your preference).
Add to this puree a tbs of paprika, 3 c. of chicken broth, a dash of lemon juice and salt and pepper to taste.  If you happened to have some jalapenos lying around, watch out! - this soup got pretty spicy (just the way I like it).
 Roasted Red Pepper and Tomato Soup (my adapted version below):
  • 3 red bell peppers - rinsed, stemmed, seeded, and halved
  • 3 tablespoons olive oil
  • 1 onion (7 oz.), peeled and chopped
  • 2 cloves garlic, peeled and minced
  • 1.5 to 2 cups of chopped homegrown tomatoes
  • 1 tablespoon paprika
  • 3 cups chicken broth (vegetable broth works as well)
  • 2 teaspoons fresh lemon juice
  • Salt and pepper
  1. Preheat the broiler. Place the red pepper halves, onions and garlic cut side down (with liberal use of evoo), in a baking pan and broil 4 to 5 inches from heat until the skins are black and blistered, about 8 minutes. Let cool, uncovered, 10 to 15 minutes.
  2. In a 3- to 4-quart pan over medium heat, simmer tomatoes, along with their juices, and the paprika. Bring to a low simmer and cook, stirring occasionally, about 3 minutes.
  3. In a blender or food processor, purée the soup in small batches until smooth. Return purée to the pan and stir in broth and lemon juice. Stir over medium heat until hot. Season with salt and pepper to taste.

19 February 2012

Home DIY: A Cubic Wall Clock

What do you do when you're bored?  Facebook, Pinterest, Reddit...  the internet offers many options.  My favorite "vice" is home design sites like design milk or Trendir.  That's where I spotted this colored cubic clock.
Source
Great minimalist design, great colors, and it is dynamic - shape-changing.  Looks pretty easy to make, too.

So I went to my local home improvement store and liberated some paint chips.  I formed them into little boxes to mount on the wall.  I picked up some clock parts and made a box to fit around the components.  I think I spent about $8 on the whole project.  It took quite a bit of time, but it was worth the effort.
Pretty simple, right?  Nothing too daunting.  And so clock-like!  I opted against putting a second hand on it.
Here are all the "numbers."
The actual clock part is the only one mounted on a nail, all the other boxes are just held up by blue masking tape.  I'm still waiting to see how that holds up - so far, so good!
Well check that guy out!  Too cool.  I'm really pleased with the results, although I have a few edits to make next time I move it.


16 February 2012

Valentine's Day!

Valentine's Day.  At once both wonderful and horrible.  When you're single, it's just an overblown, commercialized excuse for stores to guilt you into spending way too much money.  Okay, I'll admit, I did feel that way a little bit when I was single.  I didn't hate Valentine's Day, I just didn't see the point.

Having someone special has changed things.  I still make sure that there are no flowers or jewelry involved, but a nice date night is something we don't do often enough.  And since this date night was just a little extra special, I spent a grand total of $8 on a new dress.

Kyle made reservations and wouldn't tell me where.  When we got in the car he said "Okay, now give me directions to the insane asylum."  Uh...

Actually, the old insane asylum in Traverse City has been redone and refilled with shops, restaurants and a Farmers Market.  Its updated name, The Commons, expresses the simple and natural that many of the vendors exhibit in their wares.

Our dinner was a Matterhorn Grill Dinner.  The waiter assured us that this was exactly what we would be served had we just come in from skiing the Swiss Alps, along with three white wine pairings (small glasses).
This was a unique and wonderful experience.  We were served a tray of raw veggies, fruit, bread, cheese and meats.  There was a small grill right in front of us, and we could grill things at our leisure, then melt some cheese in the special trays, and cover everything in cheese.
 It was so good!  We had a semi-private room, and we were told that we could take our time and eat as slowly as we wanted.  The food was delicious, and it wasn't so much food that we were overfilled, but we did eat just about everything on the plate.
We had such a great time!  And this was a really fun dinner.  It would be a nice thing to go out and do with friends - it seems like a very social way to eat.  Thanks, Kyle, for such a wonderful night!